How to add Bullet Holes and Stickers in Unity (URP)
You can use Decal Render Feature of Unity to place bullet holes and stickers on the objects in your game.
Here is how to set it up:
Add Decal Render Feature in URP renderer Data
This solution work with URP and HDRP based projects so make sure that your project is using a Scriptable Render Pipeline!
First we have to select our ForwardRenderer Universal Render Data object (usually you will have it in Settings folder).
At the bottom of the inspector we should have Add Renderer Feature button. Here we need to select Decal because otherwise our Decals will not show up.
Create a Decal material
Next we need a new material so lets create one.
We need to set its shader to Shader Graphs /Decal
Now we can drag a bullet hole texture (grab a free bullet hole decal here) to the Base Map field.
Create a URP Decal projector
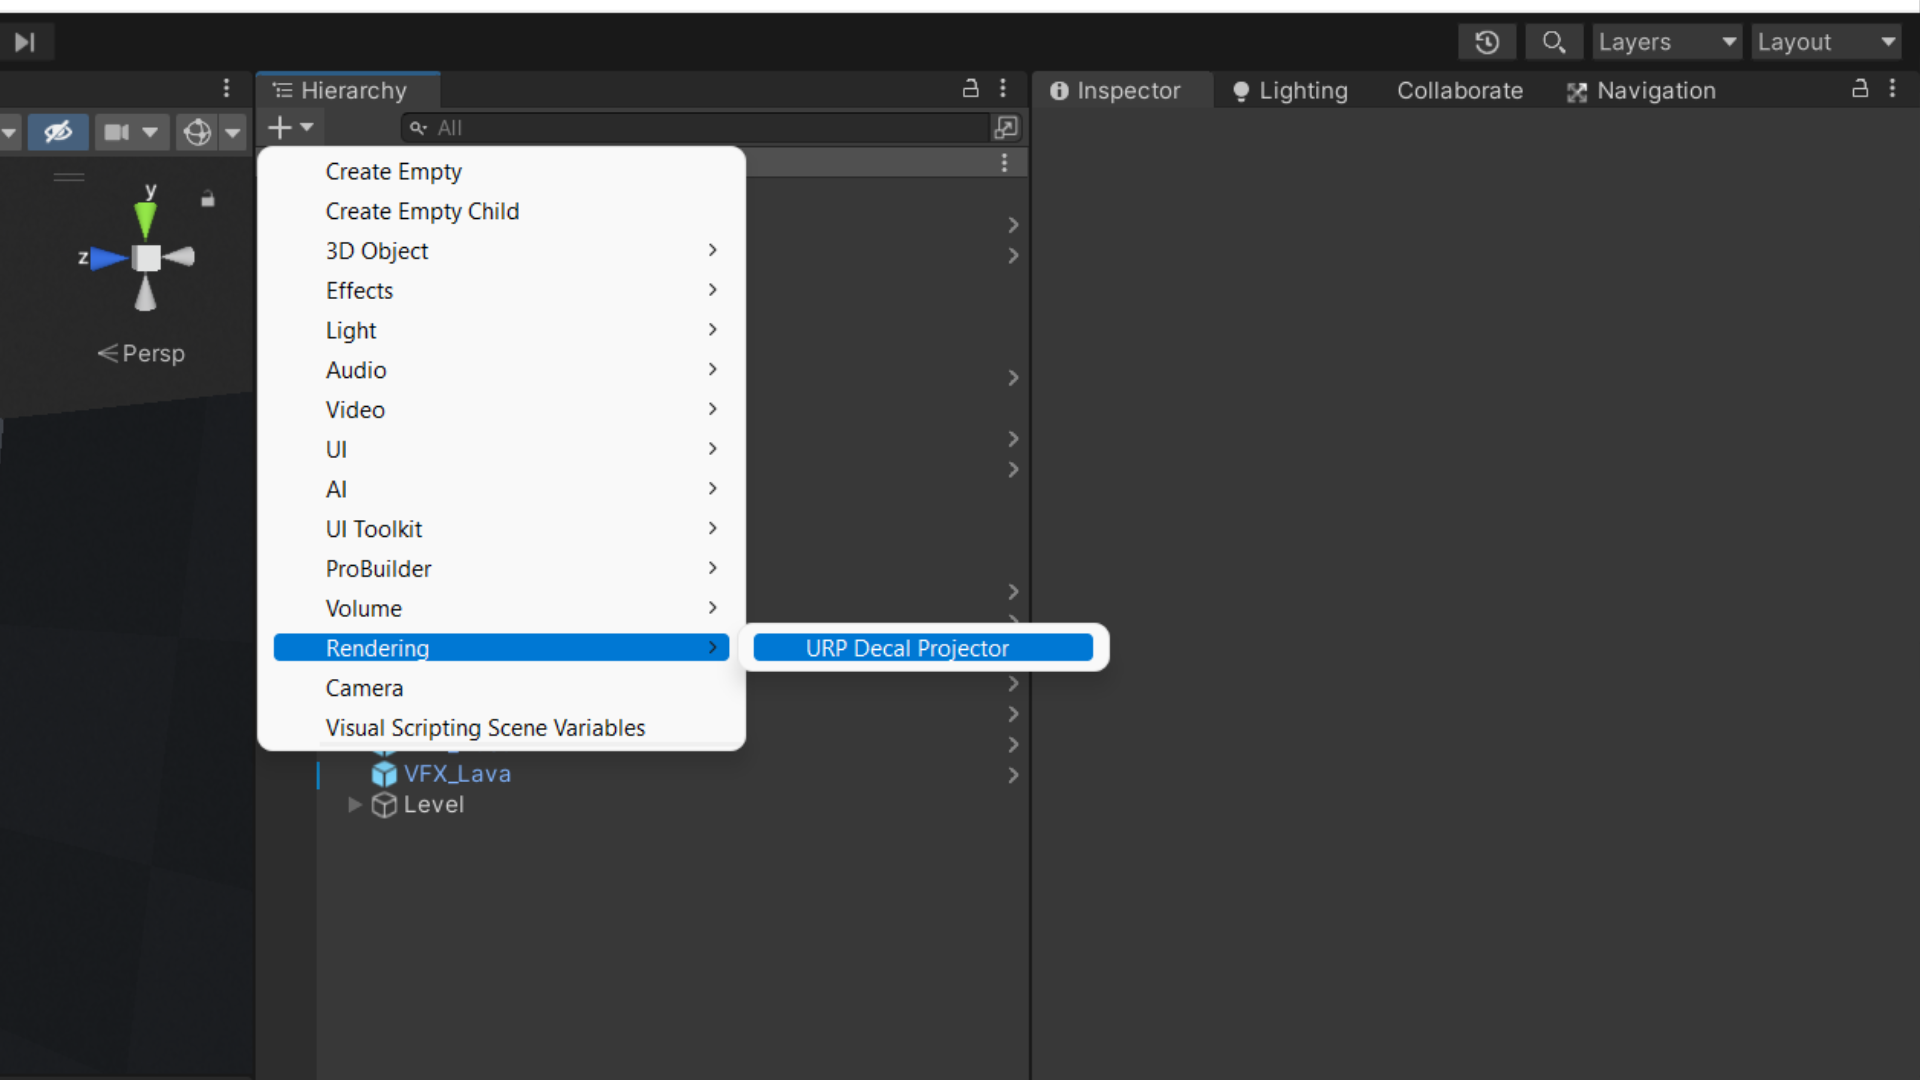
In the Hierarchy click the plus (+) icon and select Rendering and URP Decal projector
Now if you select the newly created object it should have a URP Decal projector and when you drag it near an object in your game your should see a white square appearing.
Next drag our New Material that we have created to the Material field of the URP Decal projector.
This way instead of decal we will be showing the bullet texture.
If your decal shows lines instead of your texture be sure to set the Rotation in the Transform component of the Game Object on Y = 90 and X = 0 (or just play around with the rotation values until you see your testure correctly)
This is because if you have your Gizmos turned on the white arrow representing where the texture will be drawn needs to point at the object.
Are you enjoying this article so far?
Do you want to learn more about coding in Unity? Check out my video course:
Placing Decal with a custom Script
The last step would be to create the decal where the player is pointing at (in an FPS) or where your have your mouse pointer.
Here is an example script I have used to add the decal placement functionality to the FPS Microgame made by unity
using System;
using System.Collections;
using System.Collections.Generic;
using UnityEngine;
using UnityEngine.InputSystem;
using UnityEngine.Rendering.Universal;
using UnityEngine.UI;

public class DecalPainter : MonoBehaviour
{
    [SerializeField]
    private DecalTextureData[] decalData;

    [SerializeField]
    private GameObject decalPorjectorPrefab;

    [SerializeField]
    private int selectedDecalIndex;

    [SerializeField]
    private Image decalImage;

    [SerializeField]
    private InputAction decalSwitchAction;

    Material[] decalMaterials;

    private void Awake()
    {
        decalMaterials = new Material[decalData.Length];
        decalSwitchAction.Enable();
        decalSwitchAction.performed += SwitchDecal;
        selectedDecalIndex = 0;
        foreach (Image image in FindObjectsOfType<Image>())
        {
            if (image.CompareTag("Decal"))
            {
                decalImage = image;
                break;
            }
        }
    }
    //Setting up UI image to selected decal image
    private void Start()
    {
        decalImage.sprite = decalData[selectedDecalIndex].sprite;
    }

    private void SwitchDecal(InputAction.CallbackContext obj)
    {
        selectedDecalIndex++;
        if (selectedDecalIndex >= decalData.Length)
            selectedDecalIndex = 0;
        decalImage.sprite = decalData[selectedDecalIndex].sprite;
    }

    //You could get hit.point and hit.normal by shooting a ray in the direction of the wall
    //Ex:
    //RaycastHit hit;
    //if(Physics.Raycast(transform.position, cameraTransform.forward,out hit, 20)){ ...
    public void PaintDecal(Vector3 point, Vector3 normal, Collider collider)
    {
        //Prepare a decal
        GameObject decal = Instantiate(decalPorjectorPrefab, point, Quaternion.identity);
        DecalProjector projector = decal.GetComponent<DecalProjector>();
        if (decalMaterials[selectedDecalIndex] == null)
        {
            decalMaterials[selectedDecalIndex] = new Material(projector.material);
        }
        projector.material = decalMaterials[selectedDecalIndex];
        projector.material.SetTexture("Base_Map", decalData[selectedDecalIndex].sprite.texture);
        projector.size = decalData[selectedDecalIndex].size;
        decal.transform.forward = -normal;
    }

}

/// <summary>
/// Decal data to store sprite and size
/// </summary>
[Serializable]
public class DecalTextureData
{
    public Sprite sprite;
    public Vector3 size;
}
Here is how it looks in the inspector:
Ad that is it!
I hope that you have enjoyed this blog post!
You can also check my free Unity tutorials at youtube.com/c/SunnyValleyStudio
You can also support me through Patreon:
Thanks for reading!
Peter


